If you follow me on twitter, you know that I’ve been intermittently commenting on the new Automation Tool that I’ve been building for Simulationcraft. I’m happy to say that the tool is more or less finished at this point, complete with documentation!
For those that haven’t heard about this project before, the Automation Tool allows you to quickly generate profiles to compare different talent, glyph, gear, or rotation configurations. For example, if you want to compare 10 different talent configurations, the tool will generate a profile containing 10 different players (“actors”), each of which is identical except for their talents. You can then run that simulation and look at the report to see which one of the actors performed the best, and by how much.
The point of this post is to provide a tutorial that supplements the documentation. I’m going to give you a step-by-step guide that shows how to use the tool to perform different types of comparisons. And hopefully, show some of the tool’s impressive feature set in the process.
Interface
To start using the tool, fire up Simulationcraft (version 602-1 or later, a beta of which you can download here), click on the “Import” tab, and then choose the “Automation” sub-tab. You should be looking at a screen that looks like this:
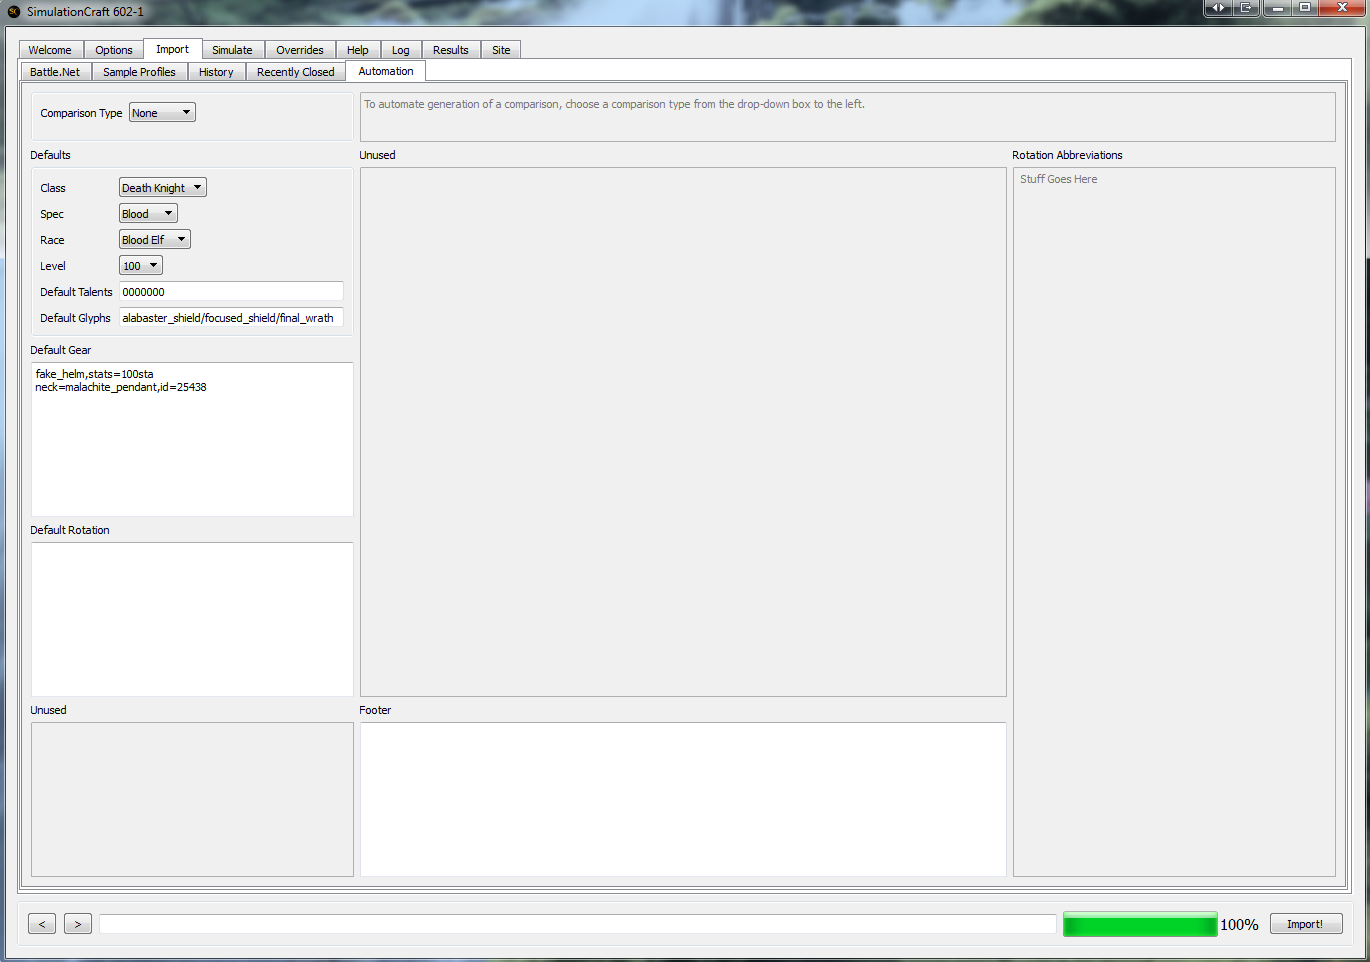
Simulationcraft’s Automation Tab – First Look
Let’s walk through the interface quickly. At the top left, we have a drop-down box that lets us choose a “Comparison Type” (currently set to “None”), and to the right there is a help text area telling us that we need to choose a comparison type to get started.
In the left column, we have a bunch of defaults. We have drop-down boxes to choose Class, Spec, Race, and Level, and some text boxes to define default talents, glyphs, gear, and rotation. The “Default Talents” box is filled in with a default “0000000” (meaning no talents), and the “Default Glyphs” box has some dummy glyphs for protection paladins. “Default Gear” has some placeholder gear, and “Default Rotations” is empty. There’s also a greyed-out “Unused” box at the bottom.
In the center column, we have another greyed-out “Unused” box, and a “Footer” text box. Finally, the right column has a greyed-out “Rotation Abbreviations” box with some placeholder text.
We can ignore all of the greyed-out boxes for now. Once we choose a comparison type, some of these boxes will become active and their titles will change to describe what they do.
Since this is a paladin blog, let’s set our default class and spec. We’ll click on the Class drop-down box and choose “Paladin,” and then choose “Protection” from the Spec drop-down. We’ll leave the Race and Level as “Blood Elf” and “100” respectively. You may have noticed that the Rotation Abbreviations text box changed when you chose a class and spec – we can ignore that until we get to the section on rotation comparisons.
We also need to specify some default talents, glyphs, and gear. For now, we’ll leave the talents and glyphs texts boxes alone (they already have defaults), but the gear box needs some attention. We’ll take the gear a premade level 100 character starts with and put it in this box (you can automatically generate this using the Simulationcraft addon).
The left column should now look something like this:

Defining some defaults.
For now we’ll leave the Default Rotation empty. As it turns out, if we don’t specify a rotation, the sim is smart enough to use the class module’s default rotation, just like it does when you import your character from the armory.
Now that we’ve gotten some defaults put in, let’s set up our first comparison.
Talent Comparisons
The first choice in the Comparison Type drop-down box is “Talents.” When we make that selection, the large text box in the center column becomes enabled and the name changes to “Talent Configurations.” In addition, the text in the box changes to some example talent configurations: “0000000,” “1111111,” and “2222222.” The other change is that the Default Talents text box becomes greyed out, indicating it’s no longer being used. Finally, the help text area gives us some instructions on how to set up a talent comparison.

Selecting the “Talents” comparison type modifies the interface.
Now let’s talk about exactly what this all means. Because we’ve chosen the “Talents” comparison type, we’ve told the tool that we want to compare several different talent configurations. It’s responded by greying out the Default Talents box and giving us a new place to list the talent configurations we want to try.
Each talent configuration is specified as a 7-digit number, with each digit corresponding to a talent tier. The first number is our level 15 talent, the second number is our level 30 talent, and so on. A zero means we haven’t chosen a talent, and a one, two, or three indicates we’ve chosen the talent in the first, second, or third column. So “0000000” is a character that has no talents, “1111111” is a character that’s taken all of the talents in the first column, and so on. Each new talent configuration is specified on a new line, with no blank lines between them (this is important).
When we hit the Import! button in the bottom right-hand corner, the tool will generate a profile containing three level 100 Blood Elf protection paladins. Each paladin will have the same glyphs and gear, but the first one will have “talents=0000000,” the second will have “talents=1111111,” and the third will have “talents=2222222.” Try this yourself, it should automatically swap you to the Simulate tab and look like this:

The profile generated by our talent automation.
As you see, the tool conveniently gives us simple names for our paladins corresponding to their talent selections, and each one is the same except for the “talents=XXXXXXX” line.
So that’s the basic function of this tool. It takes the text you supply in each of the boxes and Frankensteins it together to create multiple actors that you can simulate together. Before we do that, though, let’s go back to the Automation tab and make these paladins a little more unique.
Since the tool is simply combining bits of text, it’s very flexible. It will let us specify additional text that is specific to each actor. For example, let’s change the text in the Talent Configurations box to this:

We can modify the configurations by specifying additional options for each actor.
Again, each line is specifying a different actor. But now we have some extra options, like a name, for each actor. Each new option is separated by a single space, so we can string options together like we have for Bob and Eve.
The tool is smart enough to put these extra options at the end of the actor’s profile, so the “glyphs=alabaster_shield” command we’ve added to Bob’s profile will overwrite the default glyphs. Likewise, Eve will be sporting a new phony_helm with 100 stamina and will be standing behind the boss rather than in front of him. Also note that for Eve I’ve included “talents=” in the talent definition; the sim is smart enough to look for that and adjust its output appropriately.
If you hit “Import!” and scroll down to the end, it should look like this:

Our profile after changing the text in the Talent Configurations box.
As you can see, the “name=Bob” and “glyphs=alabaster_shield” are at the end of the third profile, and all of Eve’s options are at the end of her profile.
Since the Automation Tool puts the profile directly on the Simulation tab, it works just like a profile you import from the armory or another source. The simulation will use whatever settings you’ve chosen on the Options tab, including number of iterations, boss type, fight style, stat scaling calculation settings, and so on.
Here’s the report that Simulationcraft generates when we hit the Simulate! button:
Report for Talent Simulation
This is a raid simulation, so at the very top it shows a summary of all actors, showing DPS, HPS+APS, DTPS, and TMI charts:

After simulating, we get a raid report detailing how well each actor performed.
We can quickly see here that Eve’s configuration does the most DPS and takes the least damage, while Alice has the highest HPS and gets the best TMI score. The report also has detailed results for each actor that we can scrutinize if we want to figure out why a particular actor is performing better than another.
This example was a bit contrived due to the talent choices, but you should be able to see how you would use this tool to compare individual talents. Comparing one actor with “talents=0000001” to another with “talents=0000002” and a third with “talents=0000003” would let you compare the spec’s level 100 talents with one another in the absence of other talents.
However, there are some warnings to keep in mind here. This sim uses the default action priority list, so if the APL isn’t properly optimized for a given talent the results will reflect that. In this example, the APL hasn’t been optimized properly for L100 talents, so even if we had looked solely at those talents we wouldn’t want to draw any conclusions about their relative strength from these results. It’s also worth remembering that talents can interact; the value of Empowered Seals could be different if you’ve chosen Sacred Shield than if you’ve chosen Eternal Flame, since Sacred Shield requires GCDs and Eternal Flame doesn’t. And we’ve also added some variables by tweaking certain players’ glyphs and gear rather than using the defaults.
In general, it’s good to keep that issue in mind when analyzing the results of this sort of simulation. There are plenty of variables involved, and you should consider all of them before drawing conclusions. As we’ve discussed in earlier TC101 articles, trying to control as many variables as possible leads to better results and an easier analysis. The tool is designed to do that as much as possible for you by setting default glyphs, gear, and rotations, but in the interest of flexibility it gives you ways to circumvent those controls.
Glyph Comparisons
If we go back to the Automation tab and switch the Comparison Type to “Glyphs,” the Default Talents text box becomes active again and the Default Glyphs box becomes greyed out. The “Talent Configurations” box is renamed “Glyph Configurations” and gets a new set of placeholder text specifying two different glyph configurations. The help text area has also changed to provide instructions for a glyph comparison.

The interface changes slightly when choosing a Glyphs comparison type.
As you might guess from the screenshot, the syntax for a glyph comparison is very similar to a talent comparison. Each set of glyphs is defined exactly as they are in any other profile, as a tokenized (i.e. lowercase, spaces replaced with underscores, all other symbols excluded) list separated by forward slashes. Each new line is a new configuration, as before. In our example above, one actor has Alabaster Shield and Focused Shield, while the second has Final Wrath and Word of Glory. We could add more actors if we wanted by adding more lines to the central text box.
For example, let’s add a third configuration that uses only Alabaster Shield – then we’ll be able to compare the first and third configuration to see how much DPS the Focused Shield glyph provides. We can also specify options like we did in the talent comparison, and to demonstrate that we’ll name this new configuration Al.

You have invited Al to the party.
At this point, I also want to talk about the Footer text box at the bottom. This box gets added to the very end of the profile, and only once. It’s there so you can specify global options that you wouldn’t want or need to repeat once for each actor. So for example, we could type “optimal_raid=0” in this box to turn off raid buffs (if we were too lazy to do that on the Options tab), or use this area to specify a custom boss or bosses. To illustrate that, let’s turn off raid buffs and specify a pair of bosses, like this:

Using the Footer text area to turn off raid buffs and spawn a pair of bosses.
If we hit Import!, we see that we now have three paladins with different glyph configurations, and our Footer text has been faithfully reproduced at the end of the profile. Like before, the tool is stitching together the text in each of the boxes to create the profile.

The generated profile for a glyph comparison.
Unlike the talent sim, this gives each paladin a generic “G_#” name rather than trying to come up with a descriptive name based on the talent configuration. So the ability to rename each actor using additional options, like we did with Al, is pretty helpful here.
Again, we can hit Simulate and generate a report, linked below.
Report for Glyph Comparison

Raid report for a glyph comparison.
Looks like Al did the most damage here. Remember that he’s using Alabaster Shield, while paladin G_0 is using both Alabaster Shield and Focused Shield. And while Focused Shield would be a DPS increase against a single target, here we have three targets, so it’s a DPS loss.
Wait, three targets? Didn’t we specify only two Fluffy Pillow bosses? What happened?
If you look at the report, you’ll see both Fluffy Pillows and a TMI_Standard_Boss_T17N:

Oops, a T17N boss snuck into this sim.
That happened because I had the “TMI Standard Boss” option on the Options->Globals tab set to “T17N.” Remember that since we’re using the Simulate tab of the GUI, the sim will use all of the options you’ve specified, including that boss option. If we want to just use the bosses we have defined in the Footer section, we need to change the TMI Standard Boss drop-down to the “custom” setting. If you do that and run the simulation again, you’ll get a report with just our two Fluffy Pillow bosses, and the DPS results of G_0 and Al will be closer together.
There’s not a lot more to say about glyph comparisons that I haven’t already said about talent comparisons. The two are pretty similar from the tool’s point of view. You can modify the talents of a particular actor by adding ” talents=xxxxxxx” as an option after their glyphs are specified, just like you could modify glyphs in the talent comparison. If you do use that flexibility, just be aware of it when you’re analyzing your results.
Before we move on to gear comparisons, I want you to go to the Comparison Type drop down and switch back to “Talents.” You’ll notice that the central text box reverts to the input we used for the talent comparison. This central text box stores its content separately for each configuration type, so you don’t have to worry about losing your old inputs when you swap between one comparison type and another. It should also save this text (and most of the other text boxes, in fact) in-between sessions, just like most of the other options in SimC do.
Gear Comparisons
Now I want you to change the Comparison Type to “Gear.” As with the other settings, the help text area updates to describe a gear comparison, and the central text box is renamed. This time it’s set to “Gear Configurations,” and some new example text appears in the center. The Default Glyphs text box is re-enabled and the Default Gear box is disabled.

The Gear Comparison interface.
Since defining an entire gear set on a single line would be a bit cumbersome, the gear comparison uses a slightly different syntax. Instead of putting each configuration on a new line, it allows you to use multiple lines for a single configuration to make it easier to see what gear you’re defining. Each configuration is now separated by a blank line. So the text we’re starting with here defines two gear configurations, each only containing a head and a neck.
If we wanted to, we could flesh these configurations out by adding shoulders, chest, etc. until each was a full gear set. We could also add more configurations as long as each new configuration was separated by a blank line. And we could add options (like a name) to each configuration by adding lines to that configuration. For example, here’s what it looks like if we add a third actor named “premade” that uses our premade character’s full gear set:

Adding a third gear set, with a name.
That said, you can see how this would get unwieldy fast. If we wanted to define 10 gear sets, all of which used the default premade gear but had a slightly different weapon, we’d be doing a lot of copy/pasting. Luckily, there’s a slightly easier way.
I’m going to take our premade gear and save it as a simple text file, like this one:
base_gear.simc
I’m going to put that file in the “profiles” directory of my simulationcraft folder, like so:

Adding a simc file to the profiles directory.
Now I’m going to go back to the Automation tab and create three actors, each of which uses a different weapon. I’ll use this file as the base gear set by calling it directly, and then simply add a new weapon for each set on a separate line. The result looks like this:

Our modified gear comparison.
And when we hit Import!, this is what we get:

The generated profile.
Again, you’ll notice that it gives each actor a default name like “G_1,” which is why I’m naming each gear set something descriptive. Since Simulationcraft’s input is all text-based, you can actually tell it to read in entire text files on the Simulate tab like we’re doing here. It will check the profiles folder, find the base_gear.simc file, and read that file in line by line as if we had typed the entire gear set right there in the profile. Very convenient!
Keep in mind that we had to put the “main_hand=” line after the line containing “base_gear.simc” for this to work. base_gear.simc has its own definition of a main hand weapon, so if we want our new weapon to override it, it has to come second. This works just like a variable in a programming language – if I define “x=1” and then in a later line of code define “x=2”, the second definition will overwrite the first.
If we hit Simulate!, we get a report for the three actors as usual. Note that I’ve deleted the text in the Footer section and set the TMI Standard Boss drop-down back to “T17N” here.

The results of our gear comparison.
Each of the weapons has slightly different secondary stats, so they’ll all produce slightly different DPS, HPS, and DTPS numbers. TMI is largely unaffected by such a small change in the gear set.
It shouldn’t be hard to imagine uses for this simulation mode. As in this example, we could use it to test out all of the weapons within a tier to see which gives the highest total DPS. We could also define several different complete gear sets to compare combinations of tier pieces and off-set pieces, different enchanting and gemming strategies, and so on.
Also note that while I didn’t show it, you can add comments to the text in the Gear Configurations box as well. You can add a line like “#config one” anywhere in the configuration and it will show up in the generated profile.
Next Time – Rotations
As it turns out the final Comparison Type, which lets you compare rotations, is far more complex than the three we’ve demonstrated today. So much more complicated that it really deserved its own blog post. So stay tuned for next time, when we go over the most powerful part of the tool: the Rotation Comparison.

 Khira <Temerity>
 Slootbag <Midwinter>
Theck, I wanted you to know that I appreciate all you do for the tanking community, not just paladins. Also, any idea when the Simcraft bosses are going to be updated to lower damage values post “tank squish”? Or even what those values might be? Please tell me TMI is way off and that most tanks won’t be over 100k like they are now.
http://downloads.simulationcraft.org/postpatch-raid-9-9-14.html
Keep in mind that the plot you’re looking at doesn’t include all of the changes in the patch. For example, most of the paladin stuff updated automatically, but not all of it – there’s no guarantee the other classes have been updated as well. Most important of all, that doesn’t include the Resolve buff, since I didn’t push that change until a few minutes ago.
I’ll re-tune the bosses once I have a clear idea what they’ll hit for post-patch. At this point, we don’t really have any idea.
mh I chose “scale over TMI” in the options, but the results from the automation tool still scale over DTPS… any idea?
Also. the tool doesn’t take self-written APLs yet does it? I wrote an APL for EmpS that works (at least the way I want it to work) and has about 90% uptime on every of the 3 buffs. on the results from this new module it doesn’t even show any of the buffs, letting me believe it might only take the module (with the unfinished APL) and ignore my manually written APL.
The scale_over thing is a sim-wide bug someone introduced when they changed the GUI drop-down box to uppercase. Thanks for pointing that out, it’ll be fixed in the next nightly build.
I don’t know what you mean about self-written APLs. For talent, glyph, and gear comparisons you can put your own custom APL in the “Default Rotation” box and it will use whatever you give it. Easy to test, just put “actions=/crusader_strike” in the Default Rotation box, import, and sim – all of your characters will only use Crusader Strike.
http://gyazo.com/ab0f5d76cb9c54f17dac60786f1a0949
http://gyazo.com/6874341195bba1aaab288b536089799d
http://gyazo.com/0e3ef4f651f6b5cee787221886ecea08
For the Rotations type, wait until today’s blog post!
mh well that is about what I did. I have a rotation where I use a condition to change seals for empS. ( https://dl.dropboxusercontent.com/u/38739176/sdq/my_APL_WOD_01.JPG ) it works fine when I sim a single toon the “oldschool” way. -> https://dl.dropboxusercontent.com/u/38739176/sdq/Buffs_singlesim.JPG
Now with the automation tool I want to compare all 3 lvl 100 talents with the same toon: https://dl.dropboxusercontent.com/u/38739176/sdq/automation_tool.JPG
Here are the buffs of the player that uses EmpS: https://dl.dropboxusercontent.com/u/38739176/sdq/Buffs_ATsim.JPG
This should show the same uptime on buffs as my previous sim. But you don’t see any uthers insight/Liadrin’s righteousness or Maraad’s truth. This let me to believe that the automation tool ignores my own APL….
It certainly does look that way. I’ll do some testing with it when I get home from work. If you could do me a favor and copy/paste your complete APL into a text file and host it somewhere for me (or put it on MT), that would save me a bunch of time.
Hi, it should be that one here if I’m not mistaken: https://dl.dropboxusercontent.com/u/38739176/sdq/Schroom_APL.txt
it’s a version I backed up about 3 weeks ago. I don’t think I changed anything or at least anithing significant since, but I’ll check in the morning, as I do the sims on my work PC so I only have access to it tomorrow (I’m EU it’s 19:20 now here) I’ll check tomorrow if it is the right one, but I’m about 95% sure it is ^^
Your APL is never casting Judgment, because you never applied a seal. The lines of your APL that do cast seals are dependent on Judgment’s cooldown, which is always zero because it can never be cast (because you don’t have a seal!).
Adding “actions.precombat=/seal_of_insight” to your Default Rotation box fixes the issue, and the buffs start showing up.
true. I forgot that I use
actions.precombat+=/seal_of_insight
actions.precombat+=/sacred_shield,if=talent.sacred_shield.enabled
on my singletoon sims. I seperated them by comments to make it more clear and missed to add them to the automation :p
thanks for pointing that out.
Pingback: Simulationcraft 6.0.2 – New Features | Sacred Duty